背景
在图转换中间件的开发过程中,需要准备一个开发测试打包一体化环境,该环境至少需要把开发好的中间件代码打包,并上传到我们的私有 npm 仓库中。
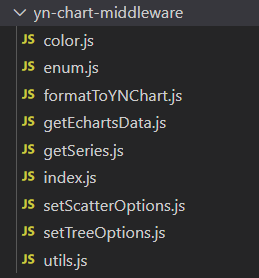
中间件代码如下:

准备过程
由于之前的开发测试环境有太多无关代码,现在准备自己重新着手搭建一个纯净的打包环境。优先实现 library(即中间件源码) 文件打包并上传到 npm 中;其次实现本地启动 webpack server,用来作为开发环境调试代码服务器;再次实现本地 vue 项目打包,并放在服务器中可用
创建项目
新建一个项目文件夹,起名 test,然后在当前项目目录运行
可以看到当前生成了一个 package.json 文件
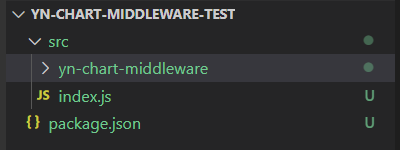
然后在当前目录中新建 src 文件夹,用来存放项目代码。并把我们的中间件文件放入其中。现在文件目录是这样的:

集成 webpack
安装
我们需要把中间件代码打包成一个文件,方便压缩代码和引用等。现在引入 webpack 作为打包工具。由于现在 webpack5 比较新,我们直接安装 webpack5
1
| npm install webpack@5 --save-dev
|
当前初始的 package.json 文件是这样的
1
2
3
4
5
6
7
8
9
10
11
12
13
14
15
16
17
| {
"name": "test",
"version": "1.0.0",
"description": "test",
"main": "index.js",
"scripts": {
"test": "echo \"Error: no test specified\" && exit 1"
},
"keywords": [
"test"
],
"author": "guan",
"license": "ISC",
"devDependencies": {
"webpack": "^5.24.3"
}
}
|
使用
我们利用 webpack 文件,把一些基本的 webpack 配置写在文件里,然后通过 package.json 中的命令行执行 webpack 命令。
为了试验,我们在 src 目录下新建 index.js 文件,输入测试代码:
1
2
3
4
| const test = () => {
console.log("hello webpack!");
};
export { test };
|
在根目录下新建 webpack.config.js 文件,输入以下代码:
1
2
3
4
5
6
7
8
9
10
11
12
13
14
15
16
| const path = require("path");
module.exports = {
mode: "production",
entry: "./src/index.js",
output: {
filename: "main.js",
library: "ynChartMiddleware",
libraryTarget: "umd",
path: path.resolve(__dirname, "lib"),
},
optimization: {
minimize: false,
},
};
|
然后在 package.json scripts 字段下加入以下命令:
1
| "build": "webpack --config webpack.config.js"
|
现在在控制台执行命令:
控制台报错:
1
2
3
4
5
| CLI for webpack must be installed.
webpack-cli (https:
We will use "npm" to install the CLI via "npm install -D webpack-cli".
Do you want to install 'webpack-cli' (yes/no):
|
因为我们想要使用命令行方式调用 webpack 需要首先安装 webpack-cli,所以我们选择安装;再次执行打包命令后得到目标文件(lib/main.js)代码:
1
2
3
4
5
6
7
8
9
10
11
12
13
14
15
16
17
18
19
20
21
22
23
24
25
26
27
28
| (function webpackUniversalModuleDefinition(root, factory) {
if (typeof exports === "object" && typeof module === "object")
module.exports = factory();
else if (typeof define === "function" && define.amd) define([], factory);
else if (typeof exports === "object")
exports["ynChartMiddleware"] = factory();
else root["ynChartMiddleware"] = factory();
})(self, function () {
return (() => {
"use strict";
...
...
var __webpack_exports__ = {};
__webpack_require__.r(__webpack_exports__);
__webpack_require__.d(__webpack_exports__, {
test: () => test,
});
const test = () => {
console.log("hello webpack!");
};
return __webpack_exports__;
})();
});
|
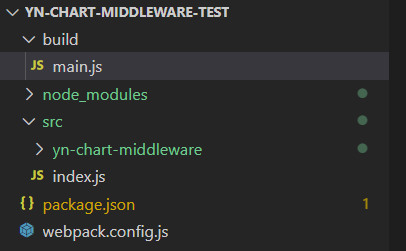
当前文件目录结构:

上图可以看到,我们确实把 src/index.js 文件代码打包成了 lib/main.js
ES6 转 ES5
在上面的实践中,我们可以看到,虽然我们实现了模块化打包,但是我们发现 webpack 并没有自动进行代码版本转换。
原代码:
1
2
3
4
| const test = () => {
console.log("hello webpack!");
};
export { test };
|
打包后:
1
2
3
4
5
6
7
8
9
10
11
12
13
14
15
16
17
18
19
20
21
22
23
24
25
26
27
28
29
30
31
32
33
34
35
36
37
38
39
40
41
42
43
44
45
46
47
48
49
50
51
52
53
54
55
56
57
58
59
60
61
62
| return (() => {
"use strict";
var __webpack_require__ = {};
(() => {
__webpack_require__.d = (exports, definition) => {
for (var key in definition) {
if (
__webpack_require__.o(definition, key) &&
!__webpack_require__.o(exports, key)
) {
Object.defineProperty(exports, key, {
enumerable: true,
get: definition[key],
});
/******/
}
/******/
}
/******/
};
/******/
})(); /* webpack/runtime/hasOwnProperty shorthand */
/******/
/******/ /******/ (() => {
__webpack_require__.o = (obj, prop) =>
Object.prototype.hasOwnProperty.call(obj, prop);
})();
(() => {
__webpack_require__.r = (exports) => {
if (typeof Symbol !== "undefined" && Symbol.toStringTag) {
Object.defineProperty(exports, Symbol.toStringTag, {
value: "Module",
});
}
Object.defineProperty(exports, "__esModule", { value: true });
};
})();
var __webpack_exports__ = {};
__webpack_require__.r(__webpack_exports__);
__webpack_require__.d(__webpack_exports__, {
test: () => test,
});
const test = () => {
console.log("hello webpack!");
};
return __webpack_exports__;
})();
|
这样的代码在 ie11 中无法运行,我们得把 es6 语法编译为 es5。
首先我们把 webpack 自己生成的打包代码变为 es5,这需要再 webpack.config.js 中配置参数:
该参数意思是打包时编译为类浏览器环境,并按 es5 的风格进行打包。但是这样只会改变 webpack 默认的打包代码,而我们自己的代码任然不会被转码。
因此我们需要引入 babel,来转码我们的 js 文件。先在 webpack 中添加 babel 规则,可以正则检测文件。也可以认为,在 webpack 中使用 babel 就需要使用 babel-loader 来作为连接纽带,用来编译目标文件代码:
1
2
3
4
5
6
7
8
9
10
11
| module: {
rules: [
{
test: /\.m?js$/,
exclude: /(node_modules)/,
use: {
loader: "babel-loader",
},
},
],
},
|
我们需要安装 babel-loader 包和 @babel/core 包,并且需要在根目录创建一个 babel 配置文件,文件名为”.babelrc”,该文件用来告诉 babel 应该如何转码文件,该文件配置如下:
1
2
3
4
5
6
7
8
9
10
11
12
13
14
15
16
17
| {
"presets": [
[
"@babel/preset-env",
{
"useBuiltIns": "usage",
"modules": false,
"corejs": {
"version": 3
},
"targets": {
"ie": "11"
}
}
]
]
}
|
该文件主要定义了输出的代码版本,以上用到了 @babel/preset-env 用来转换代码,所以我们需要安装它。
现在我们再次执行 build 命令,得到如下编译过后的代码:
1
2
3
4
5
6
7
8
9
10
11
12
13
14
15
16
17
18
19
20
21
22
23
24
25
26
27
28
29
30
31
32
33
34
35
36
37
38
39
40
41
42
43
44
45
46
47
48
49
50
51
52
53
54
55
56
57
58
59
60
61
62
63
64
65
| return (function () {
"use strict";
var __webpack_require__ = {};
!(function () {
__webpack_require__.d = function (exports, definition) {
for (var key in definition) {
if (
__webpack_require__.o(definition, key) &&
!__webpack_require__.o(exports, key)
) {
Object.defineProperty(exports, key, {
enumerable: true,
get: definition[key],
});
/******/
}
/******/
}
/******/
};
/******/
})(); /* webpack/runtime/hasOwnProperty shorthand */
/******/
/******/ /******/ !(function () {
__webpack_require__.o = function (obj, prop) {
return Object.prototype.hasOwnProperty.call(obj, prop);
};
})();
!(function () {
__webpack_require__.r = function (exports) {
if (typeof Symbol !== "undefined" && Symbol.toStringTag) {
Object.defineProperty(exports, Symbol.toStringTag, {
value: "Module",
});
}
Object.defineProperty(exports, "__esModule", { value: true });
};
})();
var __webpack_exports__ = {};
__webpack_require__.r(__webpack_exports__);
__webpack_require__.d(__webpack_exports__, {
test: function () {
return test;
},
});
var test = function test() {
console.log("hello webpack!");
};
return __webpack_exports__;
})();
|
可以看到,我们的代码已经正确的转换了箭头函数,已经把 es6 风格的代码转换成了 es5
综上所述,babel 用来转换代码版本,需要 3 个包:@babel/core babel-loader @babel/preset-env
打包中间件
打包
现在我们已经用测试文件做好了前期准备,现在我们把 webpack.config.js 中的入口文件改为中间件文件,然后出口文件名改为中间件名。
可以看到报了如下错误:

这提示我们没有安装 core-js 模块,无法找到对应的转换方法。执行:
1
| cnpm install core-js --save-dev
|
再重现 build,发现中间件中使用了 echarts,而我们也需要安装一下 echarts 包;当所有需要用到的包全部安装完毕后,我们可以看到,打包成功了。
优化打包大小
我们查看打包文件,代码风格是我们需要的 es5,但是打包文件有 3.5M,这明显太大了,我们需要减小大小。
首先第一步是代码压缩,压缩后大小从 3.5M 变为了 0.9M,明显还是太大了。
我们思考是不是可以不要打包某些包进中间件,比如 echarts。因为中间件宿主环境,也一定会引入 echarts,所以 echarts 可以不用打包进中间件。我们在 webpack 配置文件中加入以下代码:
1
2
3
4
5
6
7
8
| externals: {
echarts: {
commonjs: "echarts",
commonjs2: "echarts",
amd: "echarts",
root: "_",
},
},
|
重新打包,我们发现包文件已经变为 66KB,相比于之前的 3.5M,已经小非常多了。现在这个库文件,就已经打包完成了。
上传 npm
上传到 npm 中时,包名默认 package.json 中的 name 字段,引用路径默认 main 字段。比如我们把 package.json 改为如下,代表我们包名为 yn-chart-middleware,用户下载包后默认会引用“./lib/yn-chart-middleware.js”目录下的文件。
1
2
3
4
5
6
7
8
9
10
11
12
13
14
15
16
17
| {
"name": "yn-chart-middleware",
"version": "1.0.0",
"description": "test",
"main": "./lib/yn-chart-middleware.js",
"scripts": {
"test": "echo \"Error: no test specified\" && exit 1",
"build": "webpack --config webpack.config.js"
},
"keywords": [
"test"
],
"author": "guan",
"license": "ISC",
...
...
}
|
发布包时先使用 npm login 登录 npm,然后 npm publish 即可发布自己的包
注意:内网环境下,需要先切换 npm 源,然后登录内网 npm。之后的操作和 npm 一致
在有时候,我们不希望自己的开发文件,比如 src/目录下的文件被上传到 npm,我们可以选择不上传这部分文件到 npm 上。如下,在 package.json 中增加如下代码:
表明只把根目录下 lib 文件夹内容上传到 npm
除了上面的白名单模式,还有黑名单模式(及指定不传的文件,上传所有其他文件)
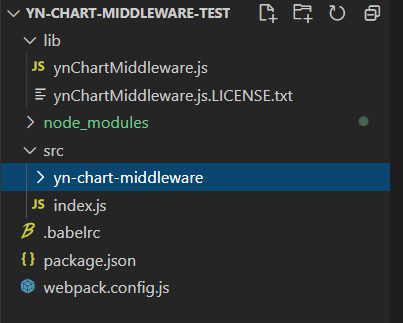
配置代码以及目录结构
目录结构:

.babelrc 文件:
1
2
3
4
5
6
7
8
9
10
11
12
13
14
15
16
17
| {
"presets": [
[
"@babel/preset-env",
{
"useBuiltIns": "usage",
"modules": false,
"corejs": {
"version": 3
},
"targets": {
"ie": "11"
}
}
]
]
}
|
webpack.config.js 文件:
1
2
3
4
5
6
7
8
9
10
11
12
13
14
15
16
17
18
19
20
21
22
23
24
25
26
27
28
29
30
31
32
33
34
35
36
37
| const path = require("path");
module.exports = {
mode: "production",
entry: "./src/yn-chart-middleware/index.js",
output: {
filename: "ynChartMiddleware.js",
library: "ynChartMiddleware",
libraryTarget: "umd",
path: path.resolve(__dirname, "lib"),
},
optimization: {
minimize: true,
},
target: ["web", "es5"],
module: {
rules: [
{
test: /\.m?js$/,
exclude: /(node_modules|bower_components)/,
use: {
loader: "babel-loader",
},
},
],
},
externals: {
    echarts: {
      commonjs: "echarts",
      commonjs2: "echarts",
      amd: "echarts",
      root: "_",
    },
  },
};
|
package.json 文件:
1
2
3
4
5
6
7
8
9
10
11
12
13
14
15
16
17
18
19
20
21
22
23
24
25
26
27
28
29
30
| {
"name": "test",
"version": "1.0.0",
"description": "test",
"main": "index.js",
"files": [
		"lib"
	],
"scripts": {
"test": "echo \"Error: no test specified\" && exit 1",
"build": "webpack --config webpack.config.js"
},
"keywords": [
"test"
],
"author": "guan",
"license": "ISC",
"devDependencies": {
"@babel/core": "^7.13.8",
"@babel/preset-env": "^7.13.9",
"babel-loader": "^8.2.2",
"core-js": "^3.9.1",
"webpack": "^5.24.3",
"webpack-cli": "^4.5.0"
},
"dependencies": {
"echarts": "^5.0.2",
"number-precision": "^1.5.0"
}
}
|
参考资料
webpack 手册


